Art Updates

Problems with Expressions

rose_wip24

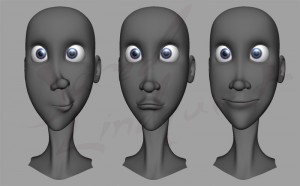
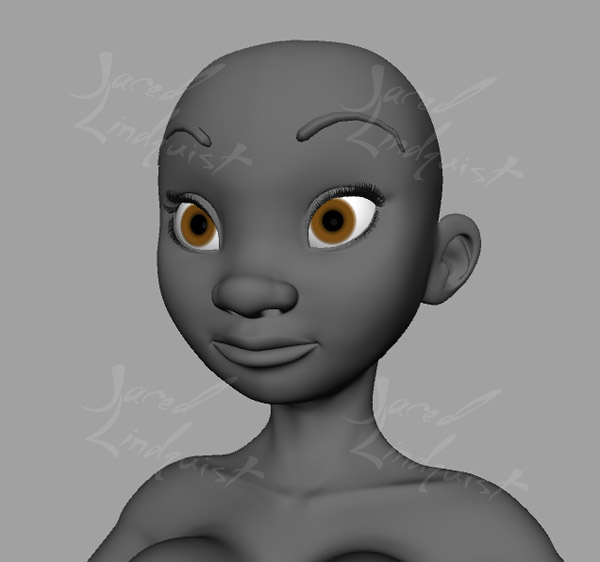
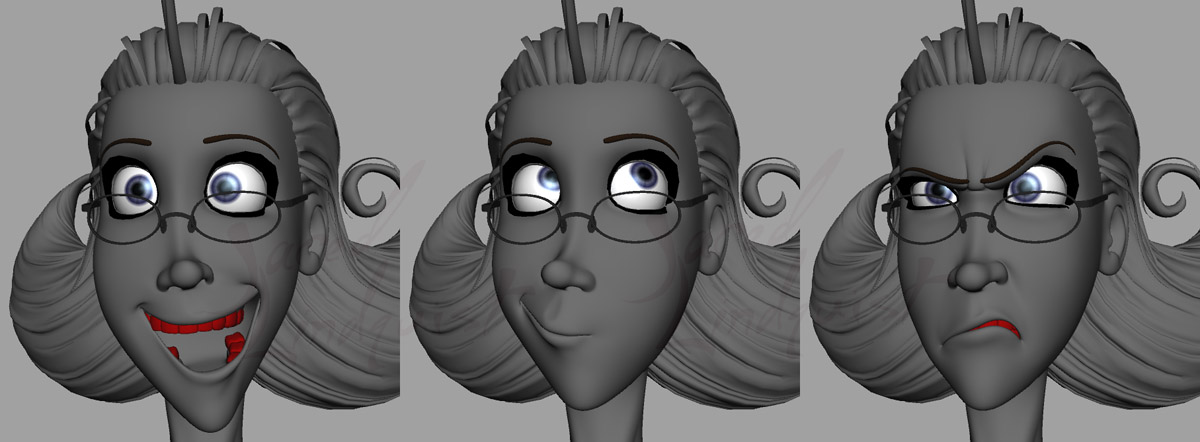
Rose’s face is proving to be a bit more trouble than I originally expected…

Some of her expressions require just a hair more know-how than I currently have, or have the patience for.  For example, I have it so her smile can be cranked up to 200% for a nice, Joker-like grin.  This requires another shape to move the nose up, but I hav no idea how this will mix with other nose shapes.  Her teeth and gums will also need to move, though I’m starting to think it’ll be better if I just don’t push her that far.


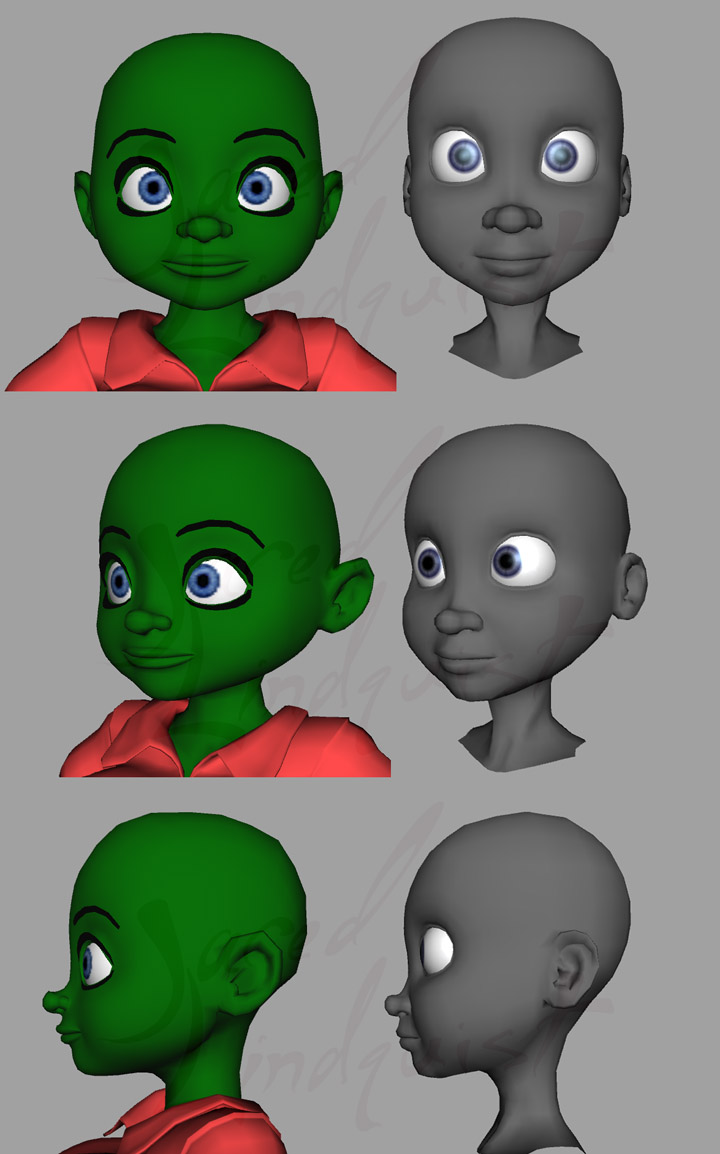
One annoying problem comes from her “mouth corner in” shapes – on their own, each of these will move the mouth to either side, along with the nose.  Combined – with the aid of a corrective shape – they form the “pucker” shape.  But when I move the sliders from 0 – 1, her nose shrinks and moves up at 0.5, only to return to normal at 1.  I tried to add another correction to compensate for this, but it only made things worse – now her nose shakes te 0.25 and 0.75.


But by far the biggest headache might be Maya’s expressions.  I’ve never used them much, and definitely not for faces – I’ve always preferrred to use utility nodes.  But I like the idea of only having a few expression nodes, rather than dozens or hundreds of utilities.  Figuring out the code to do the jobs of the utilities is a challenge, but not too difficult.  The real headache comes from Maya inexplicably mixing up my code – expressions that were working find before, and that I haven’t even touched recently, may suddenly drive the wrong shapes, or a control in an expression will be swapped out for another.  This could be a big problem, and I have no idea why it’s even happening.

Those final baby-steps

rose_wip20

Aside from shading, Rose is close to being complete – all that’s really left are her eyebrow blendshapes. I’m not very motivated to model them, though, because I’ve lost my kinda taste for pushing and pulling points. Fortunately Zbrush can be much faster, even if I’m not quite used to its interface yet.

rose_wip21

Something else I ended up doing out of boredom, was using Rose as a starting point for a new Daisy model. Unlike her old model, this time I made sure to use proper reference drawings –

Daisy_v2

It’s still rough, but it’s a start.

Hello, karma?

And here I was feeling so good about my bindPose tool. I had added some functionality that Maya’s dagPose command doesn’t seem to have. I pat myself on the back, job well done. Except it turns out the dagPose command is a little more complicated than I originally thought. It still doesn’t do what I need want it to do, but what it does do can be a bit… odd, depending on how you’re interacting with it.

One of the procedures I wrote over the weekend is meant to save out the member, parent, and worldMatrix values from a dagPose node to a mel file, so the node can be recreated in another file. But while testing it on Rose’s bindPose, I noticed that the values didn’t match up – some of the members would have no worldMatrix values, for example. Looking into this, things got weirder and more frustrating.

If I used `getAttr -size bindPose.members`, I would get a value of 302. Using `dagPose -q -members bindPose` would return a value of 246. A more brute-force method returned a value of 217. But if I loaded the node in the connection editor, there were 305 member slots, and they all appeared to have incoming connections. Even more confusing was that, while the getAttr command said there were only 302 members and parents, it said their were 305 worldMatrix entries.

What I’ve found out, is that even if you tell the dagPose command to store only specific objects, it appears to also store any objects above those, as well as their parents and worldMatrix values. But when queried via the dagPose command, these extra members are not returned. If at some point you reparent an object, and then delete the groups that were once above it, those objects’ connection to the dagPose node will obviously be removed, but their worldMatrix values remain.

For now, what appears to work is to use the `getAttr -size` command on all three attributes, then using the highest value to limit the loop that processes the objects. It’s a hack solution that I have a feeling will cause problems later, but for now it appears to work.

Hello, Necessity

I was hoping I’d be done with scripting for a while, but then necessity reared its head – After running into the old “skin was bound at a different pose” error, and the “Go To BindPose” screwing up character’s rig, I decided to write my own bindPose tool. There’s no reason “restoring” a bindPose should shoot a character’s jaw up through their head…

bindPoser

When the UI is loaded/refreshed, every dagPose node in the scene is selectable from a drop-down menu. If a skinned object is selected with the UI is loaded, its bindPose node is automatically selected.

Selections between the member and parent lists are synced up – select a member object will also highlight the stored parent. The pose can be restored for all nodes, or just those that are selected (something the dagPose command doesn’t appear to do). Poses can be restored globally or locally. And just to be extra careful, the current pose can be saved to a new node, so it can be restored later.


With the ability to copy and paste poses, this script could be a useful animation tool… but that’s not its intended purpose. Instead, I’ve started to write a separate script, modeled after 3DSMax’s copy/paste tool for Biped –

copyPose

For now it’s just a UI, but getting it to work should only be a matter of time… preferably after I finish Rose.

One From The Archives

Malana1Back in 2007, I was trying to figure out what to do as a follow-up to my Mary-Anne model. I was only just starting to develop stories for Mary, and I hadn’t yet run into any problems with the character, but I needed something to switch off to in the meantime.

At some point, my coworkers convinced me that I should create a video tutorial on creating 3D pinup girls, and maybe sell it to Digital Tutors. At the time, DT didn’t have anything like that, and what they did have used models that lacked appeal. That settled it – I was going to make a tutorial series!

…I was also hilariously in over my head, but I wouldn’t realize that until later.

I don’t remember spending much time on planning or design. What would the character be? French maid? Sexy nurse? Naughty Librarian? No, it should be something different… How about a hula-girl? Sure, why not, voice in my head!

I quickly settled on a design inspired by Chris Sanders’ work, drew up a model sheet, and started modeling, making sure to record video of the entire process. I had to be careful though – often I’ll zone out while I’m working, so for this project I had to stay alert and remind myself to at least mutter some vocal notes into the microphone. The actual instruction would be dubbed in later.

…or it would have, if my microphone had been working more than half the time. Once I was done modeling, I decided to review and attempt to edit the footage. Only half of it had any of my mumbled notes. The rest was dead-silent, and I know longer remembered what thought process was, or what points I intended to make. Unfortunately, this would not be the only time this happened.

Rigging is where the whole thing started to fall apart. I didn’t know nearly as much about rigging as I do now. I barely knew anything. What I did know was learned from other tutorial DVDs, which I was now regurgitating. A tutorial video doesn’t exactly work if half-way through you need to refer your viewers to someone else’s video. The only technique I could truly say was mine, was the character’s breast rig.

Also fairly late in the project, I realized I had no idea what to do about the character’s hair. Realistic hair wasn’t much of an option – Maya’s nHair either didn’t exist yet, or I didn’t have access to it; Shave And A Haircut is a plugin that not everyone would have, and isn’t/wasn’t good at long hair, so why waste time covering it? Solid, sculpted hair didn’t appeal to me. Textured strips are still a technique I haven’t figured out.

So, between the rigging and the hair, I ended up abandoning the project. honestly, if I wasn’t yet at a point where I could figure those things out on my own, then who the hell was I to teach anything to anyone else?

Malana2Looking at the character now, I’m thinking it might be time for me to clean her up and finally finish her, if only so I have a new portfolio piece. Maybe I could even turn around and sell the model online, since I don’t have any other plans for her. I also think it’d be funny to make another attempt at a tutorial video, but only for the breast rig. People would buy it. Or maybe one would buy it, and everyone else would pirate it. :p

limbTools Update

For years now, I’ve been trying to automate as much of the rigging process as possible, particularly the limbs. Two problem that’s dogged me the whole time was a lack of customization, and code that was needlessly complex and difficult to maintain. My latest tool at least comes closer to solving both issues – rather than attempting to set up a full rig with single click, I’ve opted to set up each portion of the rig separately, while also including a one-click option.

For a quick, basic rig, the all I need to do is enter in the start, middle, and end joints, check ‘Use Default Settings’, and hit the Auto-Rig button. For a more customized rig, ‘Use Default Settings’ can be left unchecked… though I’ve yet to document which options can be set.

limbTools01

In the FK section, either a new chain can be created based on the input joints, or an existing chain can be specified. By default these joints will be parented to controls, but there’s an option to apply control shapes directly to the joints instead. Gimbal controls can also be created, for an extra layer of rotation. The results are then output to the their respective lists, making it easier to select and keep track of each component.

limbTools02
Like with FK, the IK section can also prepare a new chain, but has the added option of an orient control. This is mostly useful if, say, I want the IK chain to have a different default pose than the FK. Without any other options checked, the “Apply IK” button will build a no-frills IK setup – an IK handle, a pole vector, and nothing else. Stretching can be set up with either an expression or utilities, and as a bonus, can also be applied to the FK joints. “Apply Stretching to Selection” will do just that – if an IK handle is selected, stretching will be added to its joints.

limbTools03limbTools04


Blending is fairly straight-forward – enter a control, specify a blending attribute (either a new name or an existing one), then hit the setup button. If there are no twist joints, the original input joints will be used. Otherwise, a new chain will be created.

limbTools05


The twisting section – if there are twist joints – is where the rig really comes together. Hitting the detect button will fill out the upper and lower joint lists. Three types of twisting are offered – simple, spline, and ribbon – although only simple and spline are currently implemented. Simple and spline both use spline-IK, the only difference is that simple uses 2-point linear curves.

limbTools07

Since spline uses cubic curves, it allows for rubber-hose effects even with the minimum amount of controls.

limbTools08


One thing I haven’t quite figured out yet, is how to easily rename all the nodes. Currently generic names are used, which is hardly ideal. Reverse-foot rigging is also something I need to implement, but for now the script is at least functional.

IK/FK Matching Demo

I’ve been a tad busy the past few days, figuring out how to write a script for testing and installing an IK/FK Matcher onto a rig.

The Eyes Have It

I spent most of today setting up the pose sliders for Rose’s eyes, but I’d say the results are worth it –

Yesterday I noted that it is much easier to understand how a rig works by rebuilding it. Something else I learned today, is that a character’s skin solution isn’t set in stone when you start rigging. As you’re setting up the rig, you may find it necessary to add helper joints to assist the deformation. In this case, Rose’s eye corners were sinking into her cheeks when I pull the slider down. Some extra joints help to pull the surrounding areas down, to even things out.

I’ve also added something I think the Malcolm rig was lacking: having the eyes affect the surrounding mesh as they rotate –

One other trick I’m trying out might be overkill – rather than using a wrap deformer to attach the eyebrows, I’m using a series of joints that are constrained to the surface. The main advantage to how I’ve set it up, is I can easily pull the eyebrow away from the surface for a more cartoony effect. I suppose I could have gotten the same effect by applying a cluster to the wrap-deformed brows, but I’m sure this technique may have its uses elsewhere…